Summer Arts in Melgund Township, Northwestern Ontario: Exploring and experimenting with wild clay for use in pottery and ceramics
This summer, we’re excited to be collaborating with Art Borups Corners to explore harvesting and testing wild clay from right here in Melgund Township. Our main goal is to see how well this local clay works for a series of pottery and ceramic projects we are planning for this fall. So far, the whole process has been a lot of fun.
Going into this, we had very little knowledge of how wild clays from this specific area behave when processed for ceramics, and we really wanted to find out. We also wanted to take a completely low-tech approach to the project. We want to show that anyone can learn to harvest and process their own clay without needing special studio equipment or a ton of resources. If you have a couple of buckets, some water, a basic screen, and the dirt under your feet, you can do this.
Harvesting our Wild Clay
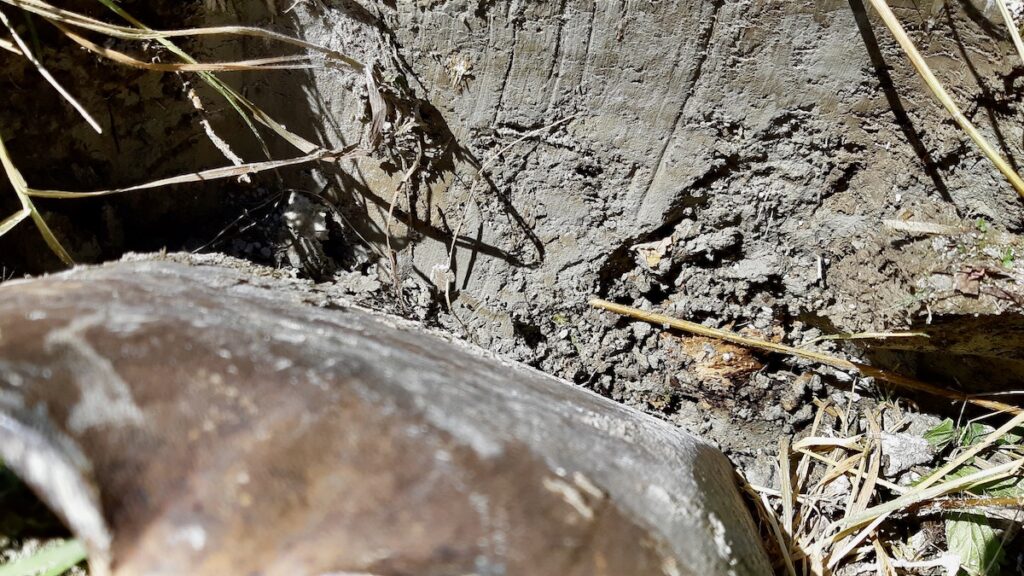
The ground beneath Melgund Township has a fascinating geological history that goes back to the end of the last ice age, roughly 10,000 years ago. As the massive continental glaciers retreated across Northwestern Ontario, they scraped over the ancient bedrock of the Canadian Shield and created massive proglacial lakes, like the historic Lake Agassiz.
Over thousands of years, the calm, freezing meltwater in these valleys allowed ultra-fine sediment to settle into thick, rhythmic layers of glaciolacustrine (glacial lake) mud. Today, these ancient lakebeds are sitting right beneath the roots of our local forests, giving us direct access to rich pockets of raw, native clay that hasn’t been touched since the ice retreated.
For potters and ceramic artists, this regional wild clay is special because of its high iron content and its dense concentration of “rock flour”—microscopic mineral dust ground down by the crushing weight of the glaciers. This unique natural blend is what gives the Melgund clay a silky, highly plastic feel when wet, while the fine micro-silts act as a built-in structural skeleton.
When fired, this type of Canadian Shield earthenware typically burns to a warm terracotta or deep, smoky iron-brown, offering a direct, tactile link right to the local landscape.
Slaking and Mixing Wild Clay
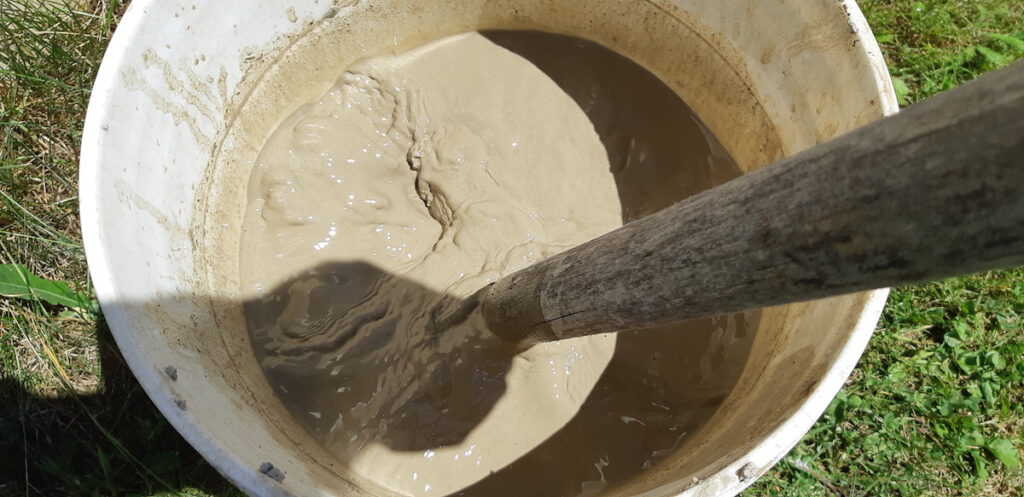
Slaking is the essential first step in turning raw, freshly dug earth into a workable ceramic material.
When clay comes straight out of the ground, it is a messy mix of hard, stubborn lumps and highly compacted clods that are completely impossible to shape or wedge in their solid state. We dropped these raw chunks into a five-gallon pail and completely submerged them in water, jumpstarting the breakdown process. The water slowly forces its way into the tight spaces between the compressed clay particles, causing the hard clods to soften and dissolve from the inside out.
The mechanics of how this works are straightforward but highly effective. As the water saturates the dry or semi-dry chunks, it breaks the physical bonds holding the dense dirt together, causing the clay platelets to separate and expand. Giving the bucket a vigorous stir with a thick wooden paddle or stick speeds up this disintegration, mechanically crushing the remaining stubborn bits.
This continuous mixing eventually transforms a bucket of rough chunks into a completely uniform, fluid slurry where the clay is fully suspended in the water, turning the raw earth into a smooth, creamy liquid base.
Pouring it all out
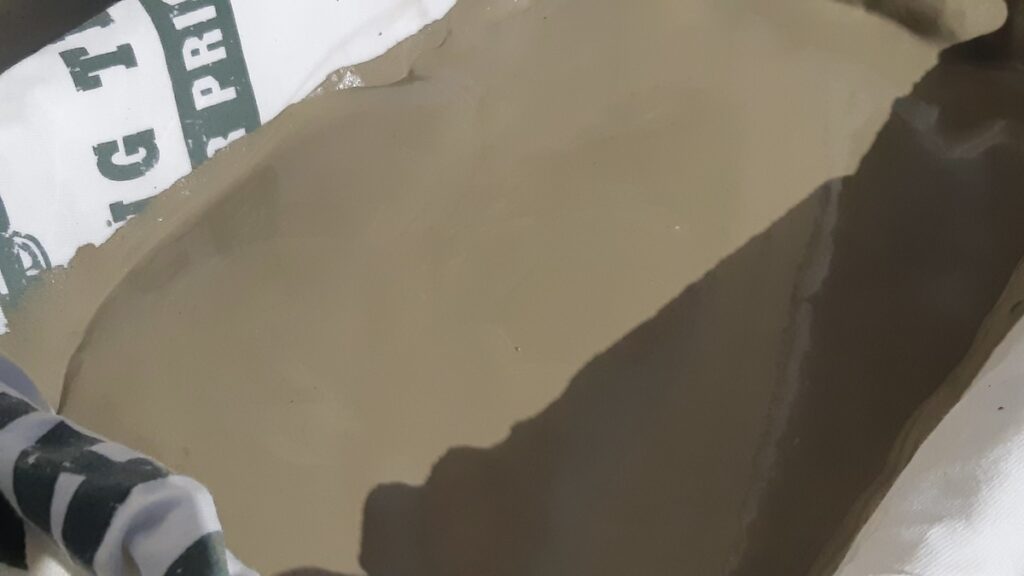
Pouring the liquid clay slurry into a pan lined with a cotton t-shirt is the method used to dewater the mixture and bring it to a workable, plastic state. After the slaking and filtering stages, the clay is far too wet and runny to be shaped or molded. To transform it into usable pottery clay, a large amount of that excess water must be drawn out evenly, which is exactly what this lining setup accomplishes.
The choice of a cotton t-shirt is important because the fabric acts as a semi-permeable, tightly woven membrane. It allows water to slowly wick through the cloth and evaporate into the air or drain into a porous base, while completely trapping the microscopic clay particles inside. If the wet slurry were poured directly into a bare, solid pan, the water would pool on top, taking weeks to dry out, and would result in an uneven, sticky mess.
Additionally, the fabric liner prevents the clay from bonding directly to the container. As the moisture leaves, the clay shrinks slightly and tightens into a firm, dough-like consistency. Because it is sitting on the cloth, the entire mass of refined clay can be lifted out of the pan cleanly in one solid piece, completely free of contamination and ready for the final stages of preparation.
Wedging Our Wild Clay
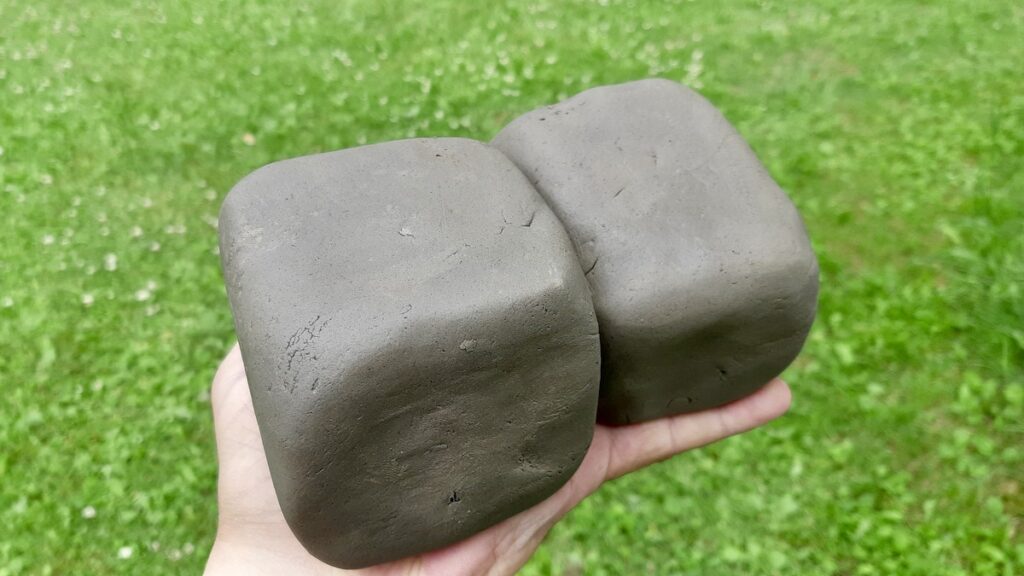
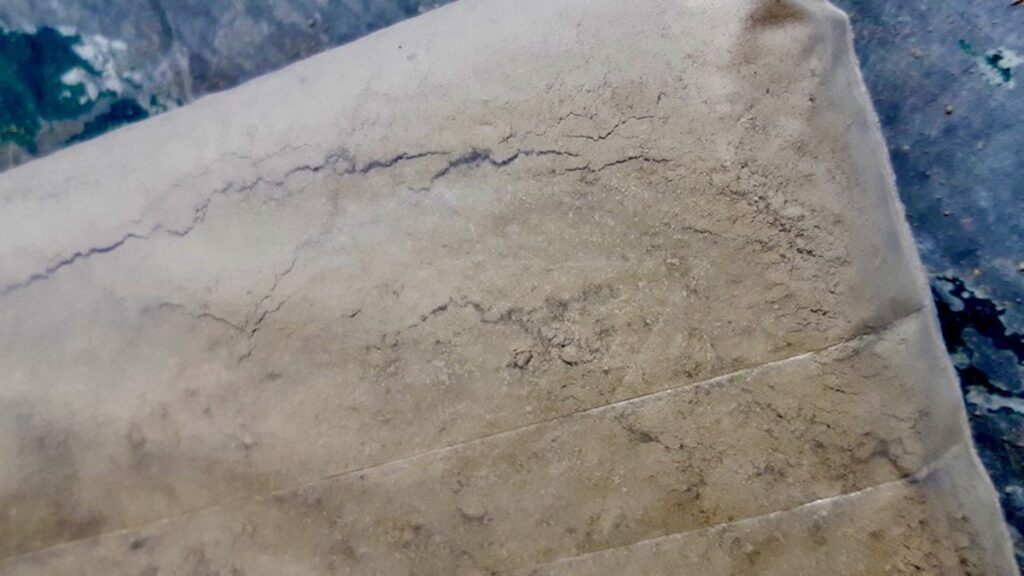
Wedging is the essential process of kneading the dewatered clay by hand, functioning much like kneading bread dough. After the clay is lifted from the fabric liner, it is still full of small air pockets, uneven wet spots, and hard dense patches. This repetitive folding and pressing aligns the clay particles on a microscopic level, distributes moisture perfectly throughout the entire mass, and drives out trapped air.
For this step, the refined Melgund Township clay was thoroughly compressed and worked into two solid, dense blocks. Thorough kneading transformed the inconsistent paste into a highly responsive, homogenous material. The smooth, tight surface of the blocks held in hand shows the direct result; the texture is uniform, pliable, and free of visible voids or air bubbles.
This step determines the structural success of any ceramic project because un-wedged clay is highly prone to failure. Trapped air bubbles create weak spots that blister or tear while building a pot. Those same pockets of air expand rapidly in a hot kiln, causing the piece to explode. Proper wedging gives this native Canadian Shield earthenware the structural integrity, strength, and uniform consistency required to survive both the pottery wheel and the upcoming fire.
Testing our Wild Clay for the First Time
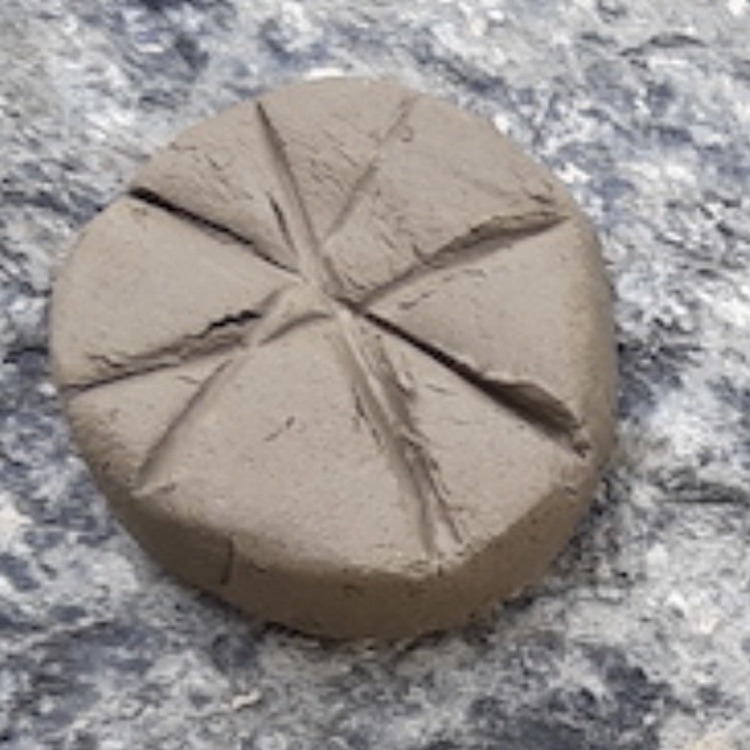
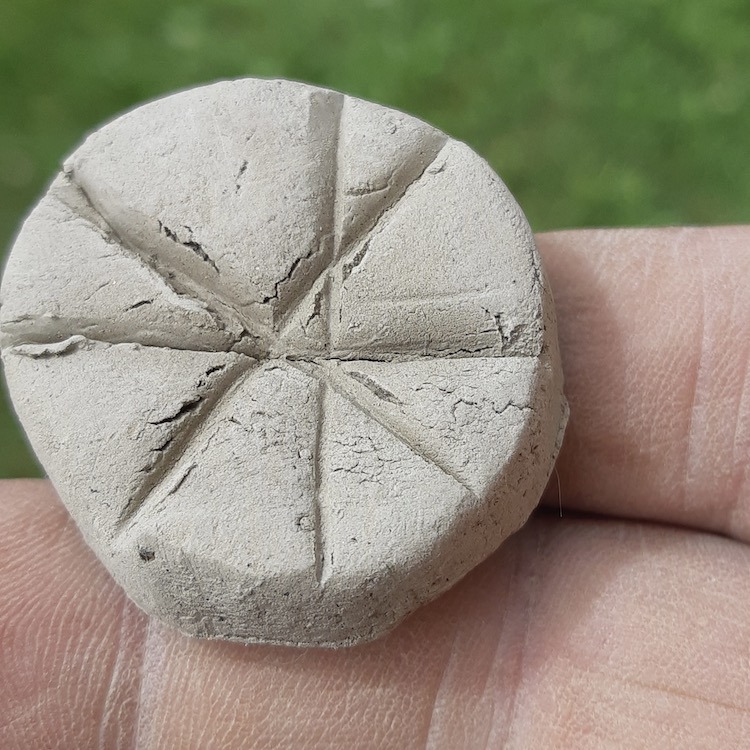
Before committing to large-scale pottery projects, running a series of small, intentional shape tests provides critical data on how a raw clay body shrinks and handles stress.
Making tiny biscuits, simple hollow structures, and open loops or coils serves a specific diagnostic purpose. Each shape isolates a different vulnerability: flat biscuits reveal whether the clay warps or cracks across a flat surface, hollow structures test how well vertical walls support their own weight, and loops or coils expose the clay’s elasticity and the strength of its joints. These miniature test pieces act as low-risk indicators, showing exactly where the material might fail before any real time is invested in building complex vessels.
The results from these specific shapes have given us some interesting early answers about the native Melgund Township earth. Forcing the simple hoop, the marked biscuit, and the small thick-rimmed structure to dry rapidly over a few hours proved that this clay possesses remarkable drying stability.
In raw wild clay, joints and seams are usually the first places to pull apart as water evaporates and the clay body shrinks. The uncompressed seam on the loop held completely tight, the deep pressed lines on the biscuit did not widen into fractures, and the distinct thickness changes on the tiny vessel caused zero warping.
This simple experiment proves that the local clay contains a highly stable, self-supporting mineral structure right out of the ground. The material shrinks uniformly without tearing itself apart under rapid dehydration. This tells us the clay has excellent green strength and high plasticity, making it reliable and resilient enough for the larger hand-built ceramic projects planned for this fall’s arts programming.
Crushing it all up!
To prepare a batch of the processed Melgund Township clay for long-term storage and shipping, the refined slurry had to be stripped of all its moisture. A few pans of the wet clay were left out to dry completely until the material turned into bone-dry, rock-hard slabs. Leaving the clay in this totally dehydrated state prevents it from moldering or spoiling over time, making it much lighter to transport and stable enough to store indefinitely.
To break down these stubborn, rock-hard slabs into a manageable form, the dry clay was wrapped up securely inside a few old t-shirts. Heavy boulders from the yard were used as makeshift mallets to smash the wrapped bundles, crushing the large chunks down into a fine, gravelly aggregate and powder. Using the t-shirts during this step kept the dry clay completely contained, preventing toxic dust from blowing into the air while keeping the local earth free from any outside dirt or debris.
A portion of this crushed, dry clay is being packed up and shipped down to friends in Montreal so they can run their own independent studio tests on the material. The remaining dry aggregate will be stored right here at the studio. Keeping the clay in a dry, crushed state means it takes up minimal space and can be preserved perfectly until the early fall.
When the community workshops and pit-firing events begin, reviving the material will be incredibly simple: just add water to the powder, let it slake, and it will instantly return to a fresh, workable, and plastic pottery clay.